On-Demand Badge Printing for Events: The Complete Guide (2026)
On-demand badge printing means badges print the moment an attendee checks in — not hours before the event at a print shop. It sounds like a small operational shift. The downstream effects are significant.
What Is On-Demand Badge Printing?
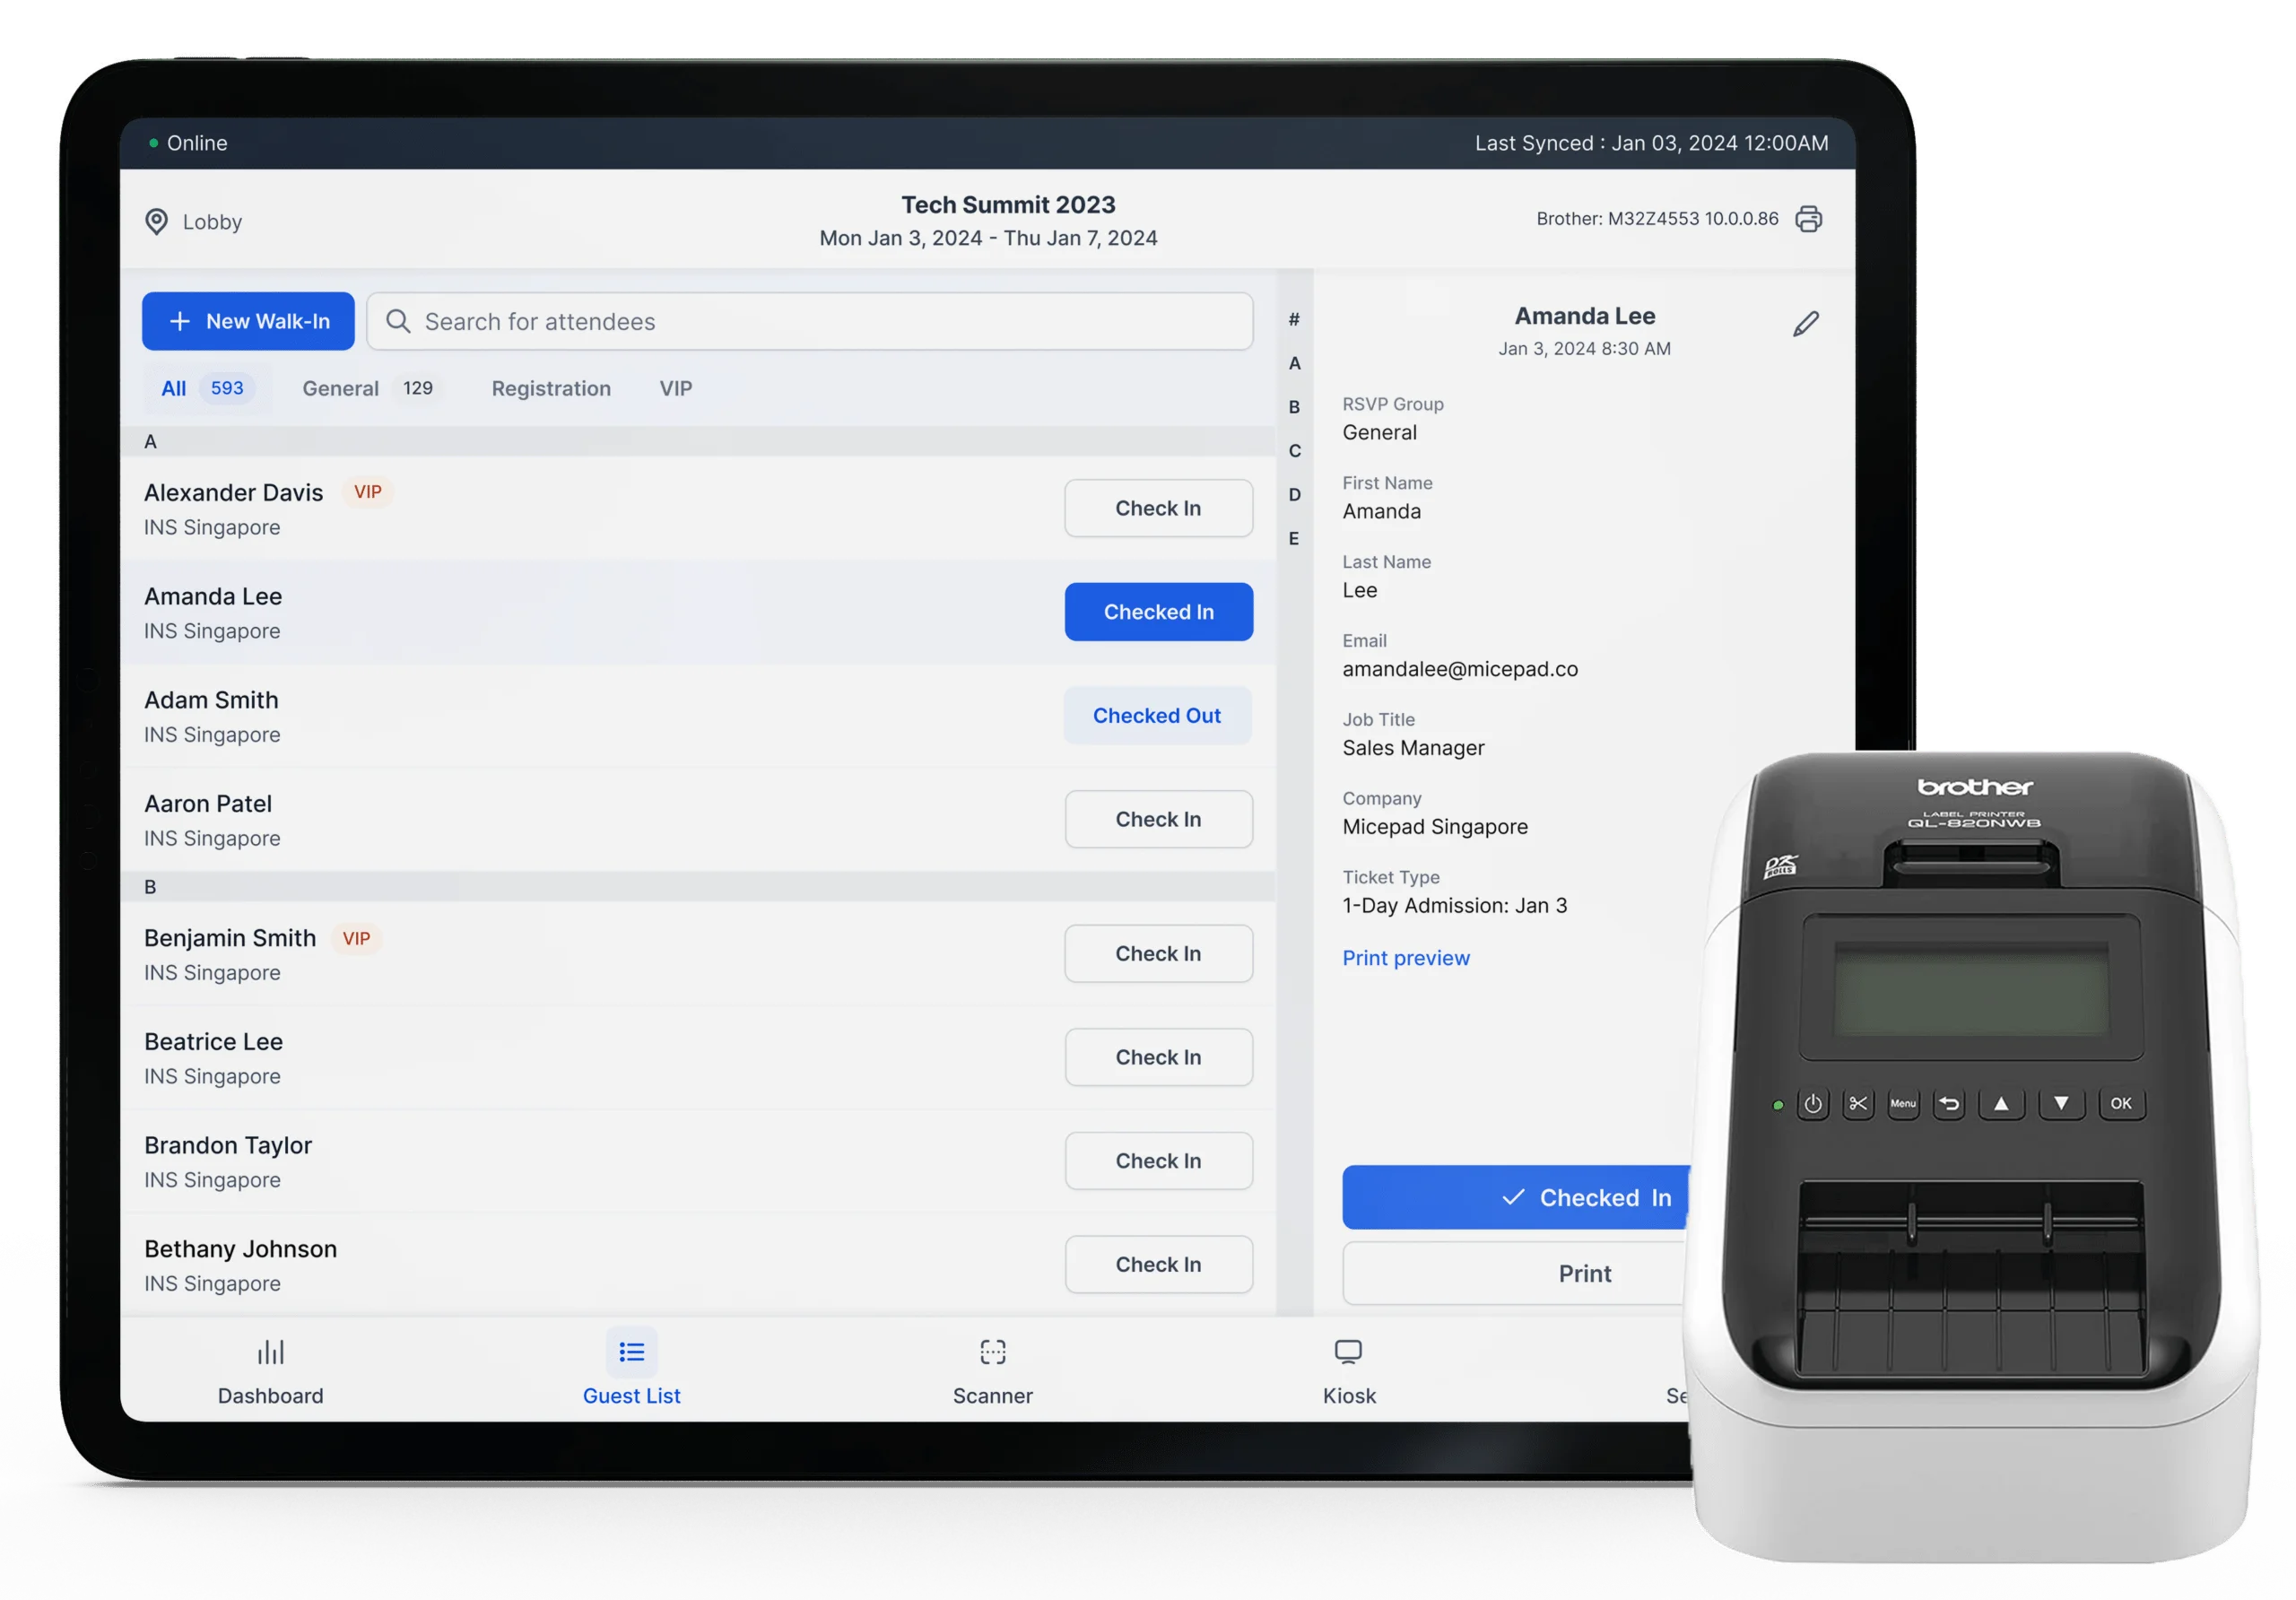
On-demand badge printing is the integration of a check-in system with a badge printer, so that a personalized badge prints automatically when an attendee completes check-in. The attendee scans their QR code (or searches their name), the check-in system confirms their record, and a badge prints from a connected thermal printer in 3–8 seconds.
This is different from: - Pre-printed badges: Produced before the event, sorted alphabetically, retrieved from a box at check-in. Wastes materials for no-shows. Requires sorting labor. - Print-on-demand at a station: Staff-operated print station separate from check-in. Faster than pre-printed, but adds a second step to the check-in flow.
On-demand printing integrated with check-in collapses two steps into one: check in and receive badge happen simultaneously.
Why On-Demand Printing Matters: The Numbers
Three statistics drive the case for on-demand badge printing:
On-demand badge printing reduces pre-event badge waste by up to 60%. Industry average no-show rates for corporate events range from 20–35%. Pre-printed badge sets are produced for 100% of registrations. That means roughly 1 in 4 badges is printed, sorted, and thrown away. On-demand printing eliminates this waste entirely — badges only print when someone checks in.
Events that switch to on-demand printing report 40–60% reduction in badge-related labor. Pre-printed badge workflows require staff to alphabetically sort, stuff envelopes, and organize badge boxes before the event. A 500-person event typically requires 2–4 hours of staff time for badge preparation. On-demand printing eliminates this step.
Name correction reprints account for approximately 8% of total badge production. Attendees change companies, misspell their names at registration, or request corrections on the day. On-demand systems handle this in 30 seconds. Pre-printed setups require maintaining a separate stack of blank badges and a printer for reprints — a fragile workflow under event-day pressure.
How On-Demand Badge Printing Works
The technical workflow has three components:
1. Check-in software with integrated badge printing. The check-in app maintains the attendee database and sends print instructions to the printer when check-in is confirmed. The badge template is pre-configured: the system fills in the attendee's name, title, company, QR code, and any other fields automatically.
2. A compatible thermal badge printer. Thermal printers use heat rather than ink or toner to produce prints. This makes them fast (3–8 seconds per badge), low-maintenance (no ink to change), and reliable under the repetitive printing demands of events. The four most commonly used printers at events:
| Printer | Badge Size | Connection | Print Speed | Best For |
|---|---|---|---|---|
| Zebra ZD421 | Up to 4" wide | USB, WiFi, Bluetooth | 4 sec/badge | Standard setups, mid-size events |
| Zebra ZD621 | Up to 4" wide | USB, WiFi, Bluetooth, Ethernet | 3 sec/badge | High-volume events, fast throughput |
| Brother QL-820NWB | Up to 2.4" wide | USB, WiFi, Bluetooth | 5 sec/badge | Name tags, compact badges |
| Brother QL-1110NWB | Up to 4" wide | USB, WiFi, Bluetooth | 4 sec/badge | Full-size badges, no ribbon required |
3. Badge label stock. Thermal printing requires heat-sensitive label stock. Badge labels come in various sizes — standard name badge (4" x 3"), credential badge (3.375" x 2.125"), and custom sizes. Order 20% more label stock than your expected attendance to account for test prints, reprints, and walk-ins.
Badge Design Best Practices
On-demand systems print whatever is in the badge template. The template design determines whether attendees can read each other's badges from across the room and whether the badge looks professional.
What to include on a badge
Essential: - First name (large — this is what people read to introduce themselves) - Last name - Company or organization - Attendee type (if your event distinguishes between attendees, speakers, sponsors, VIPs)
Optional depending on event type: - Job title (useful for B2B networking events) - QR code (enables lead scanning by exhibitors or session-level check-in) - Session tracks or dietary notes (useful for large conferences with multiple tracks) - Event name and date (useful for multi-day events)
Typography
- First name should be the largest text element. At a conference, people scan badges to see who they're talking to. Make the first name readable at arm's length.
- Use a minimum font size of 18pt for names. 24pt or larger is better for names.
- Avoid decorative fonts. Use a clean sans-serif (Arial, Helvetica, or similar) for all text except possibly the event logo.
Color and branding
- High contrast between text and background is more important than aesthetic alignment with brand guidelines. White or light gray backgrounds with dark text are most readable under event lighting.
- If using color-coding for attendee types (e.g., blue for attendees, red for speakers), use large colored areas or borders — not small colored dots — so types are visible at a distance.
Testing
Before the event, print 10–15 test badges. Check that: - Names print at the correct size and position - The QR code (if included) scans correctly - Text doesn't overflow on long names or company names - Print quality is acceptable — no fading, smearing, or misalignment
Setup: Connecting Printer to Check-in System
The connection between the check-in app and the printer can be USB, WiFi, or Bluetooth. For kiosk setups, wireless is strongly preferred — it eliminates cable clutter between the iPad and the printer.
Bluetooth pairing (recommended for iPad-based kiosks): 1. Power on the printer and hold the Bluetooth pairing button until the indicator light flashes. 2. On the iPad, open Settings > Bluetooth and wait for the printer to appear. 3. Tap the printer name to pair. 4. In the check-in app (e.g., Micepad), go to printer settings and select the paired printer. 5. Print a test badge to confirm the connection.
WiFi connection (recommended for multi-printer setups): 1. Connect the printer to your event's WiFi network via the printer's network menu. 2. Note the printer's IP address from the network settings. 3. In the check-in app, enter the printer's IP address to add it. 4. Print a test badge to confirm.
Always test the printer connection at least 30 minutes before doors open. Printer connections occasionally drop during the setup period as other devices compete for the network. A test print confirms the link is live before attendees arrive.
Walk-in Badge Printing
Walk-ins — attendees who arrive without pre-registering — require a slightly different workflow:
- Direct the walk-in to a staffed help desk (not a self-service kiosk).
- A staff member enters the walk-in's name, email, and company in the check-in app's walk-in registration screen.
- The system adds them to the attendee list and triggers a badge to print.
- The entire process takes approximately 90 seconds.
Systems like Micepad include walk-in registration as a built-in feature. The walk-in receives the same badge as a pre-registered attendee — there's no visual difference, which avoids any sense of second-tier treatment.
What On-Demand Printing Costs
The cost breakdown for on-demand badge printing:
Hardware: - Zebra ZD421 printer: $350–$500 (purchase) or $150–$250/event (rental through event technology providers) - Zebra ZD621 printer: $500–$700 (purchase) - Brother QL-1110NWB: $200–$300 (purchase)
Badge label stock: - Standard 4"x3" thermal labels: $30–$60 per roll of 500 labels - Custom pre-cut badge labels: $60–$120 per 500 labels
Software: - Micepad Pro + Badges plan: from $600/event, badge printing included - Standalone check-in with badge printing: varies by platform
The comparison: Pre-printing 500 badges at a print shop costs $300–$600 in printing fees plus $400–$800 in staff time for sorting and preparation. On-demand printing at $600 for software plus $60 in label stock ($660 total) produces the same 350–400 actual check-ins (after 20–30% no-shows) while eliminating 100–150 wasted badges.
Frequently Asked Questions
Can I use on-demand badge printing without a dedicated event check-in app?
Technically yes, but practically difficult. On-demand printing requires a database of attendee records, a QR scan trigger, and printer integration — these are the core features of a check-in app. Using a generic printing solution without check-in integration means you lose the automatic trigger and have to manage print jobs manually.
What happens if the printer runs out of label stock mid-event?
Have spare label rolls accessible at each printer station — not packed away in a storage box. Swap the roll in 60 seconds. Micepad and similar apps queue print jobs while the printer is paused, so no check-ins are lost during a roll swap.
Can I pre-print some badges and on-demand print others?
Yes. A common setup for events with VIPs: pre-print VIP and speaker badges in advance (premium finish or different size), use on-demand printing for all general attendees. The check-in system can be configured to suppress automatic printing for specific attendee types and use a manual print trigger for those.
Do thermal badges fade over time?
Thermal prints are durable for event use — they last days to weeks without noticeable fading. They are, however, sensitive to prolonged heat exposure (leaving them in direct sunlight or on a hot surface) and some solvents. For multi-day conferences, thermal badges hold up fine. For badges that need to survive months (permanent ID cards), thermal is not the right technology.
Related Resources
- State of Event Check-in: Statistics & Benchmarks — Data on badge waste, check-in times, and kiosk throughput.
- Event Kiosk Setup Guide — How to set up self-service kiosks with integrated badge printing.
- Badge Printing Product — Micepad's on-demand badge printing, integrated with check-in.
- Event Check-in App — QR check-in, kiosk mode, and offline operation.
Designing event badges?
See how Micepad handles badge design, printing, and on-demand custom branding.