Self-Service Event Kiosk Setup Guide: Hardware, Config & Throughput Planning
Self-service kiosks have become standard for events over 200 attendees. The core argument: a staffed check-in desk processes 60–80 people per hour and requires a trained operator. A self-service kiosk processes roughly 100 per hour and needs only occasional monitoring. For a 1,000-person conference, that difference means 4 fewer registration staff members or significantly shorter queues with the same team.
This guide covers kiosk setup from hardware selection through day-of troubleshooting.
What Is a Self-Service Event Kiosk?
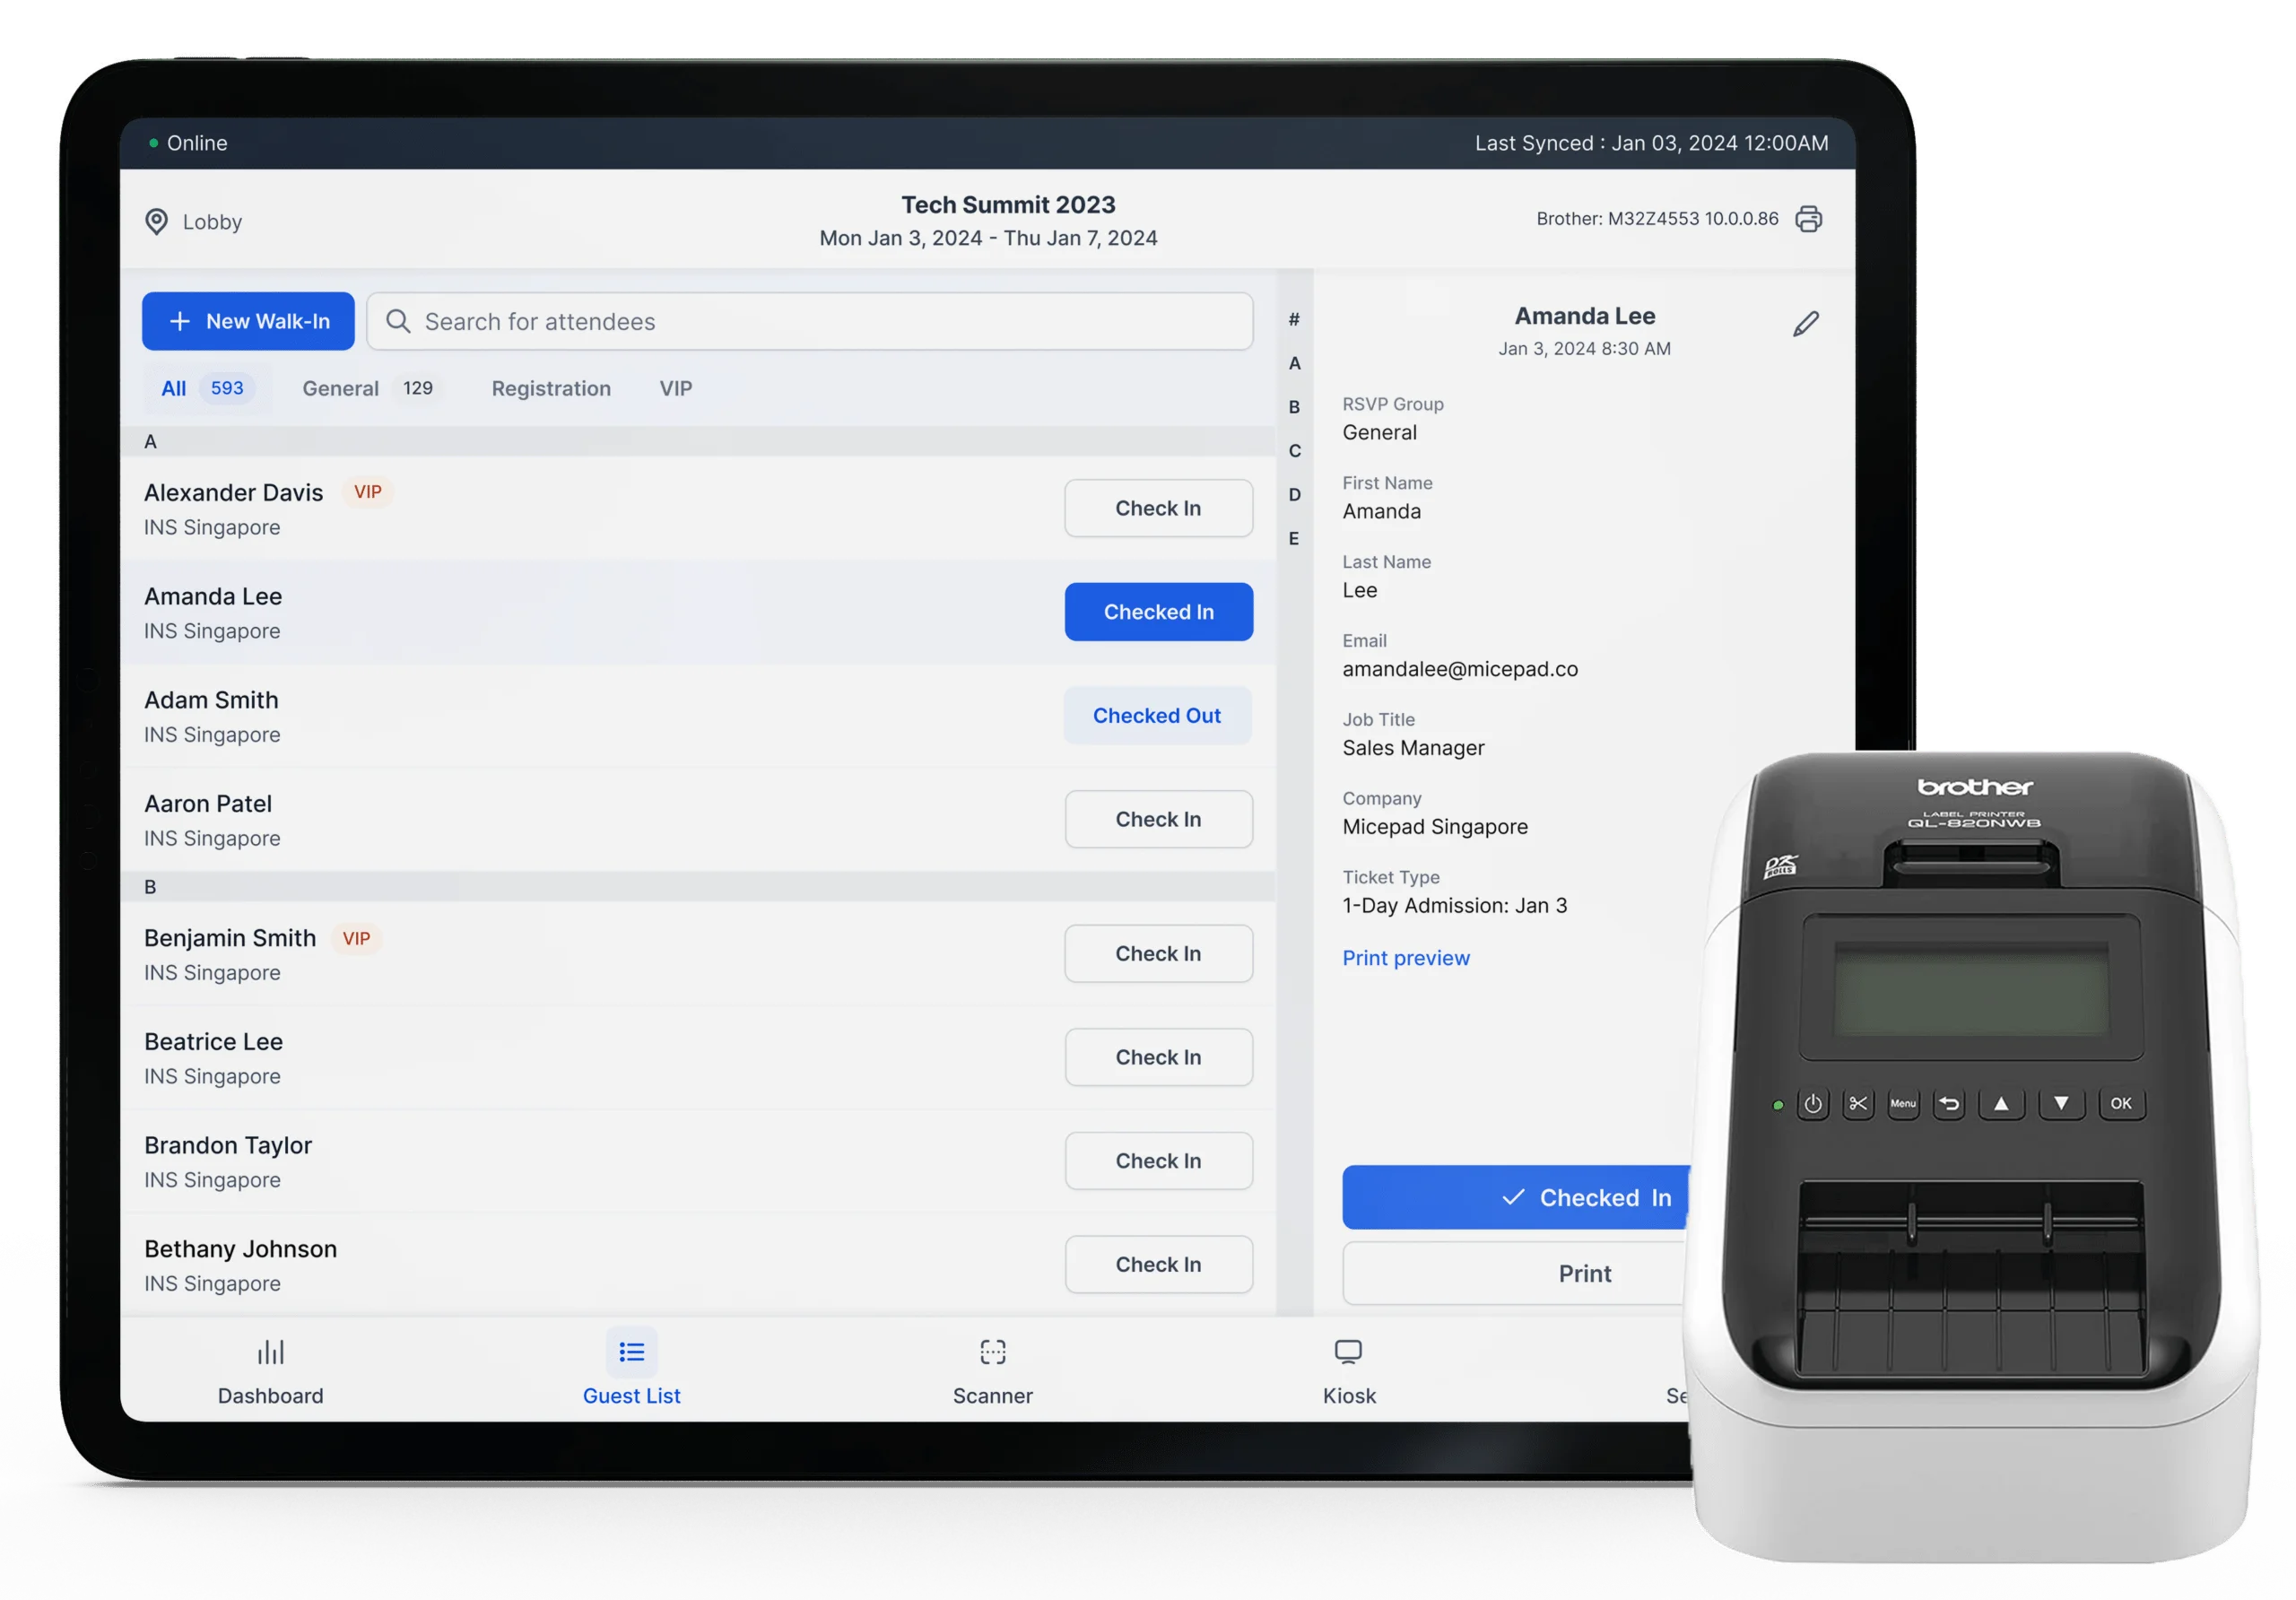
A self-service event kiosk is a tablet or touchscreen device — typically an iPad — mounted on a stand, running check-in software in a locked-down mode. Attendees walk up, scan their QR code or search by name, and the kiosk confirms their check-in. If badge printing is integrated, a personalized badge prints automatically from an attached printer.
The key difference from a staffed station: the attendee handles the entire process themselves in 15–30 seconds. Staff monitor the kiosk area and handle exceptions, but they are not required for every single check-in.
When kiosks work well: - Your event has 200+ attendees (efficiency gains become meaningful at this scale) - Most attendees have pre-registered and have a QR confirmation - You want to reduce staffing costs without reducing throughput - You want a modern, professional first impression at the registration area
When to use staffed desks instead: - Most attendees are walk-ins without pre-registration - Your audience is less comfortable with self-service technology - Complex check-in processes: payment collection, credential verification, physical package handoff
How Many Kiosks Do You Need?
This is the most important planning question. Under-provision kiosks and you get queues. Over-provision and you've spent money on equipment that sits idle.
The formula
Kiosks needed = (Expected attendees in peak window) ÷ (Throughput per kiosk per hour × Peak window hours)
Most events see 60–70% of attendees arrive within the first 90 minutes. Use 0.65 as your peak arrival fraction.
Example: 600-person conference. 80% show rate = 480 actual attendees. 65% arrive in 90 minutes = 312 people.
Kiosks needed = 312 ÷ (100 check-ins/hour × 1.5 hours) = 312 ÷ 150 = 2.1 → round up to 3 kiosks
Add 1–2 staffed desks for walk-ins, name corrections, and VIPs.
Quick reference by event size
| Event Size | Show Rate | Peak Arrivals | Kiosks Needed | Staffed Desks |
|---|---|---|---|---|
| 100–200 | 85% | 110–140 | 1–2 | 1–2 |
| 200–500 | 80% | 100–260 | 2–3 | 1–2 |
| 500–1,000 | 75% | 240–490 | 3–5 | 2 |
| 1,000–3,000 | 72% | 470–1,400 | 5–12 | 2–4 |
| 3,000–5,000 | 70% | 1,370–2,275 | 12–20 | 4–6 |
Always round up one kiosk beyond the calculated number. Equipment failures happen and a single-point-of-failure in a kiosk line creates a disproportionate impact on wait times.
Hardware Options
Option 1: iPad on a floor stand (recommended for most events)
An iPad (10th generation or newer) mounted on a weighted floor stand, running a check-in app in kiosk mode. This is the standard setup for corporate events and conferences.
- Cost: $350–$500 per iPad + $150–$350 per floor stand
- Pros: Familiar interface, lightweight, easy to transport, iPad rental widely available
- Best stands: CTA Digital VSSATB, Heckler WindFall Floor Stand, Lilitab Flip Floor Stand
- Look for: Weighted base (10+ lbs), cable management channel, locking enclosure, tilt adjustment
Option 2: iPad on a tabletop stand
Compact mount that sits on a registration table, angled toward the attendee.
- Cost: $30–$150 per stand
- Pros: Compact, cheap, easy to add multiple to one table
- Cons: Requires a table, less visible from a distance
- Best for: Events with existing registration tables, tight spaces
Option 3: Micepad SmartKiosk
A purpose-built event kiosk that integrates iPad mounting and badge printing in a single compact unit. Designed for event portability: ships to your venue, sets up in minutes.
- Pros: All-in-one design, professional appearance, quick setup, available for rent
- Best for: Events that want a polished kiosk experience without assembling separate components
- Availability: Singapore and Hong Kong through Micepad
Pairing with a badge printer
On-demand badge printing turns the kiosk from a check-in point into a complete registration station. Attendee scans QR code, check-in confirms, badge prints in 3–8 seconds. No pre-sorted badge boxes, no wasted labels from no-shows.
Recommended printers:
| Printer | Badge Size | Speed | Connection | Notes |
|---|---|---|---|---|
| Zebra ZD421 | Up to 4" | ~4 sec | USB, WiFi, BT | Standard corporate events |
| Zebra ZD621 | Up to 4" | ~3 sec | USB, WiFi, BT, Ethernet | High-volume, fastest print speed |
| Brother QL-820NWB | Up to 2.4" | ~5 sec | USB, WiFi, BT | Compact name badges |
| Brother QL-1110NWB | Up to 4" | ~4 sec | USB, WiFi, BT | Full-size, no ribbon required |
Place the printer within arm's reach of the kiosk and position the output tray facing the attendee. Use wireless printing (Bluetooth or WiFi) to eliminate cable clutter between the iPad and printer.
Software Configuration
Kiosk mode setup (iPad Guided Access)
Without kiosk mode, attendees will inevitably press the home button, open other apps, or change device settings.
- Open Settings > Accessibility > Guided Access and toggle it on
- Set a passcode (staff need this to exit)
- Open your check-in app
- Triple-click the iPad side button to start Guided Access
- Tap Start in the top right
The iPad is now locked to the check-in app. All other inputs are disabled.
Important settings to configure: - Auto-Lock: Never — the screen must stay on throughout the event - Brightness: 80–100% — venues are often bright; dim screens are hard to read - Auto-Brightness: Off — prevents the screen dimming under spotlights - Do Not Disturb: On — no notifications on a kiosk screen
Check-in app setup
In Micepad or your check-in app of choice: 1. Create the event and import your attendee list 2. Enable kiosk mode (full-screen self-service interface) 3. Connect the badge printer (Bluetooth or WiFi pairing) 4. Enable offline mode — the full attendee list should be cached locally on the device 5. Configure the walk-in registration screen (minimum required fields: name, email) 6. Set the screen timeout: automatic return to the check-in screen after each completed check-in (10–15 seconds is standard)
Network Setup
Connectivity is the most common failure point for event kiosks.
Primary: Venue WiFi (separate SSID)
Ask the venue for a dedicated WiFi network for your registration devices, separate from the attendee network. Most venues offer this for $200–$500. Without a dedicated SSID, your kiosk competes with attendees' phones for bandwidth — exactly when you need it most.
Backup: Cellular hotspot
Bring a dedicated cellular hotspot device (not phone tethering — phones overheat under sustained load and disconnect at critical moments). A device like the Netgear Nighthawk M6 handles 30+ connected devices.
Always-on: Offline mode
Configure offline mode regardless of what network you have. In Micepad, offline mode is enabled by default: the full attendee list is cached on the device. Check-ins sync when connectivity returns.
Three statistics on venue connectivity: - Venue Wi-Fi fails or degrades for approximately 1 in 3 events during peak arrival (Micepad support data) - Events with offline-capable check-in report zero check-in disruptions due to network failure - Average time from network failure to offline mode activation: 0 seconds (automatic failover)
Physical Setup
Power
Each kiosk station needs 2–3 outlets: one for the iPad/stand, one for the printer, one spare. Use surge protectors with 6+ foot cords. Tape all floor-crossing cables with gaffer tape — never duct tape, which leaves residue and damages flooring.
Placement
- Position kiosks immediately after the venue entrance — the first thing attendees see when they walk in
- Leave at least 4 feet between kiosks to prevent crowding
- Create a clear flow direction: queue enters from one side, exits from the other
- Place at least one staffed help desk visible from the kiosk area for attendees who need assistance
Signage
Post above or behind each kiosk: - "Self Check-In — Scan Your QR Code" - Step-by-step instructions: "1. Scan QR code → 2. Confirm your name → 3. Take your badge" - If attendees need their QR code: "Open your confirmation email to find the QR code"
For multi-kiosk setups, add overhead directional signage so attendees at the back of the queue can see available kiosks.
Day-of Checklist
Arrive 2–2.5 hours before doors open.
- [ ] Set up all kiosk stations and connect power
- [ ] Power on iPads and printers
- [ ] Connect to WiFi (primary and backup)
- [ ] Open check-in app, sync latest attendee list
- [ ] Connect printers via Bluetooth/WiFi in app
- [ ] Print 3–5 test badges per printer
- [ ] Run full check-in test: scan QR → confirm check-in → badge prints
- [ ] Test offline mode: disable WiFi, complete a check-in, re-enable WiFi, verify sync
- [ ] Brief all staff: normal flow, walk-in process, escalation contacts
- [ ] Place signage and queue barriers
- [ ] Final walk-through, then open doors
Troubleshooting Common Problems
QR code won't scan: - Ask the attendee to increase phone brightness - Switch to name search as fallback (any good check-in app has this)
Badge didn't print: - Check the printer's Bluetooth/WiFi connection indicator - Power-cycle the printer (off 10 seconds, back on) - Check for jammed or depleted label stock - Route the attendee to a staffed desk while you fix the printer
Attendee not found: - Search by email instead of name - If genuinely a walk-in, use the walk-in registration screen - If they registered after the last sync, pull down to refresh the attendee list
iPad screen frozen: - Force restart: Volume Up, Volume Down, then hold Top button until Apple logo appears - Reopen app, re-enable Guided Access - Total downtime: approximately 60 seconds — this is why you have spare iPads
WiFi down: - Switch to cellular hotspot - Confirm offline mode is active (attendee list is cached, check-ins queue for sync) - No check-in data is lost in offline mode
Expert Perspective
"87% of event planners cite attendee check-in as their top day-of operational concern. The biggest driver of that stress is uncertainty: will the technology work? How long will the queue get? Self-service kiosks with offline mode remove both variables. If you've set them up correctly, checked-in 10 test attendees at 7:30am, and confirmed badge printing, you know exactly what to expect when doors open." — Micepad Team, based on survey of 200 event planners, 2024.
Related Resources
- State of Event Check-in: Statistics & Benchmarks — Throughput numbers, badge waste data, and kiosk adoption benchmarks.
- Event Check-in Best Practices Guide — Station planning, staffing, and day-of operations.
- QR Code Event Registration Guide — How QR codes work for check-in, setup instructions.
- SmartKiosk Product — Micepad's purpose-built event kiosk.
- Event Check-in App — QR scanning, kiosk mode, offline operation.
Buying kiosk hardware? Read this first.
Recommended hardware, throughput math, BYO vs rental cost analysis — all in our resources hub.