The Complete Event Planning Checklist: A Month-by-Month Timeline
This event planning checklist is the roadmap you need to stay organized from first idea to post-event follow-up. Planning an event without a checklist is like navigating without a map. You might get there eventually, but you'll take wrong turns, miss things, and arrive more stressed than you need to be.
This event planning checklist organizes every key task into a timeline — from the big-picture decisions you make six months out, down to the moment-by-moment operations on the day itself. Whether you're running a corporate conference, a product launch, or an industry summit, this template gives you a structured foundation to build from.
Bookmark it, copy it into your project tracker, and adapt it to your event's needs.
6+ Months Before: Foundation and Strategy
This is where the event lives or dies. Decisions made at this stage ripple through everything that follows.
Goals and Success Metrics
- Define the primary purpose of the event (lead generation, brand awareness, education, networking, customer retention)
- Set measurable goals — number of attendees, NPS score, pipeline generated, media coverage
- Identify your target audience and ideal attendee profile
- Determine the event format: in-person, hybrid, or virtual
Budget
- Establish a total budget with a 10–15% contingency buffer
- Break the budget into categories: venue, AV, catering, speakers, marketing, staffing, technology, and swag
- Identify potential revenue streams: ticket sales, sponsorships, exhibitor fees
- Assign a budget owner and set up a tracking system
Venue and Date
- Research and shortlist venues based on capacity, location, accessibility, and AV capabilities
- Check for conflicts with public holidays, industry conferences, and local events
- Confirm parking, public transport links, and accommodation nearby
- Negotiate and sign the venue contract — clarify cancellation clauses
- Lock in the date and communicate it to key stakeholders immediately
Team and Vendors
- Assign an event owner and define the planning team structure
- Identify which functions you'll handle in-house versus outsource (AV, catering, design, photography)
- Begin researching and shortlisting vendors for critical services
3–6 Months Before: Programming and Promotion
With the foundation in place, focus on content and getting people registered.
Speakers and Agenda
- Define the agenda structure: keynotes, panels, breakouts, networking sessions
- Identify and reach out to keynote speakers — confirm availability and fee
- Send speaker briefing packs covering topic guidelines, format, and AV requirements
- Build a preliminary run-of-show document
Sponsorship
- Create a sponsorship prospectus with tiered packages
- Identify and approach potential sponsors — align packages to their marketing goals
- Negotiate and sign sponsor agreements
- Clarify what deliverables sponsors receive (logo placement, speaking slots, booth space, data)
Marketing and Registration
- Launch the event website or landing page with key details and registration link
- Set up online event registration — choose a platform that handles ticketing, confirmation emails, and attendee data in one place
- Begin email marketing campaigns to your existing audience
- Activate social media promotion across relevant channels
- Pitch event coverage to relevant industry media and newsletters
- Consider early-bird pricing to drive early registrations
Logistics Planning
- Brief caterers on expected numbers, dietary requirements, and service style
- Begin planning room layout and flow for each session
- Identify AV requirements for each space: screens, microphones, live streaming needs
1–3 Months Before: Operational Detail
This phase is where your checklist gets granular. Every process that will run on the day needs to be documented now.
Attendee Experience
- Design and send personalized confirmation emails with event details, directions, and agenda
- Set up a registration reminder sequence (4 weeks, 1 week, day before)
- Prepare an attendee FAQ or help page for common questions
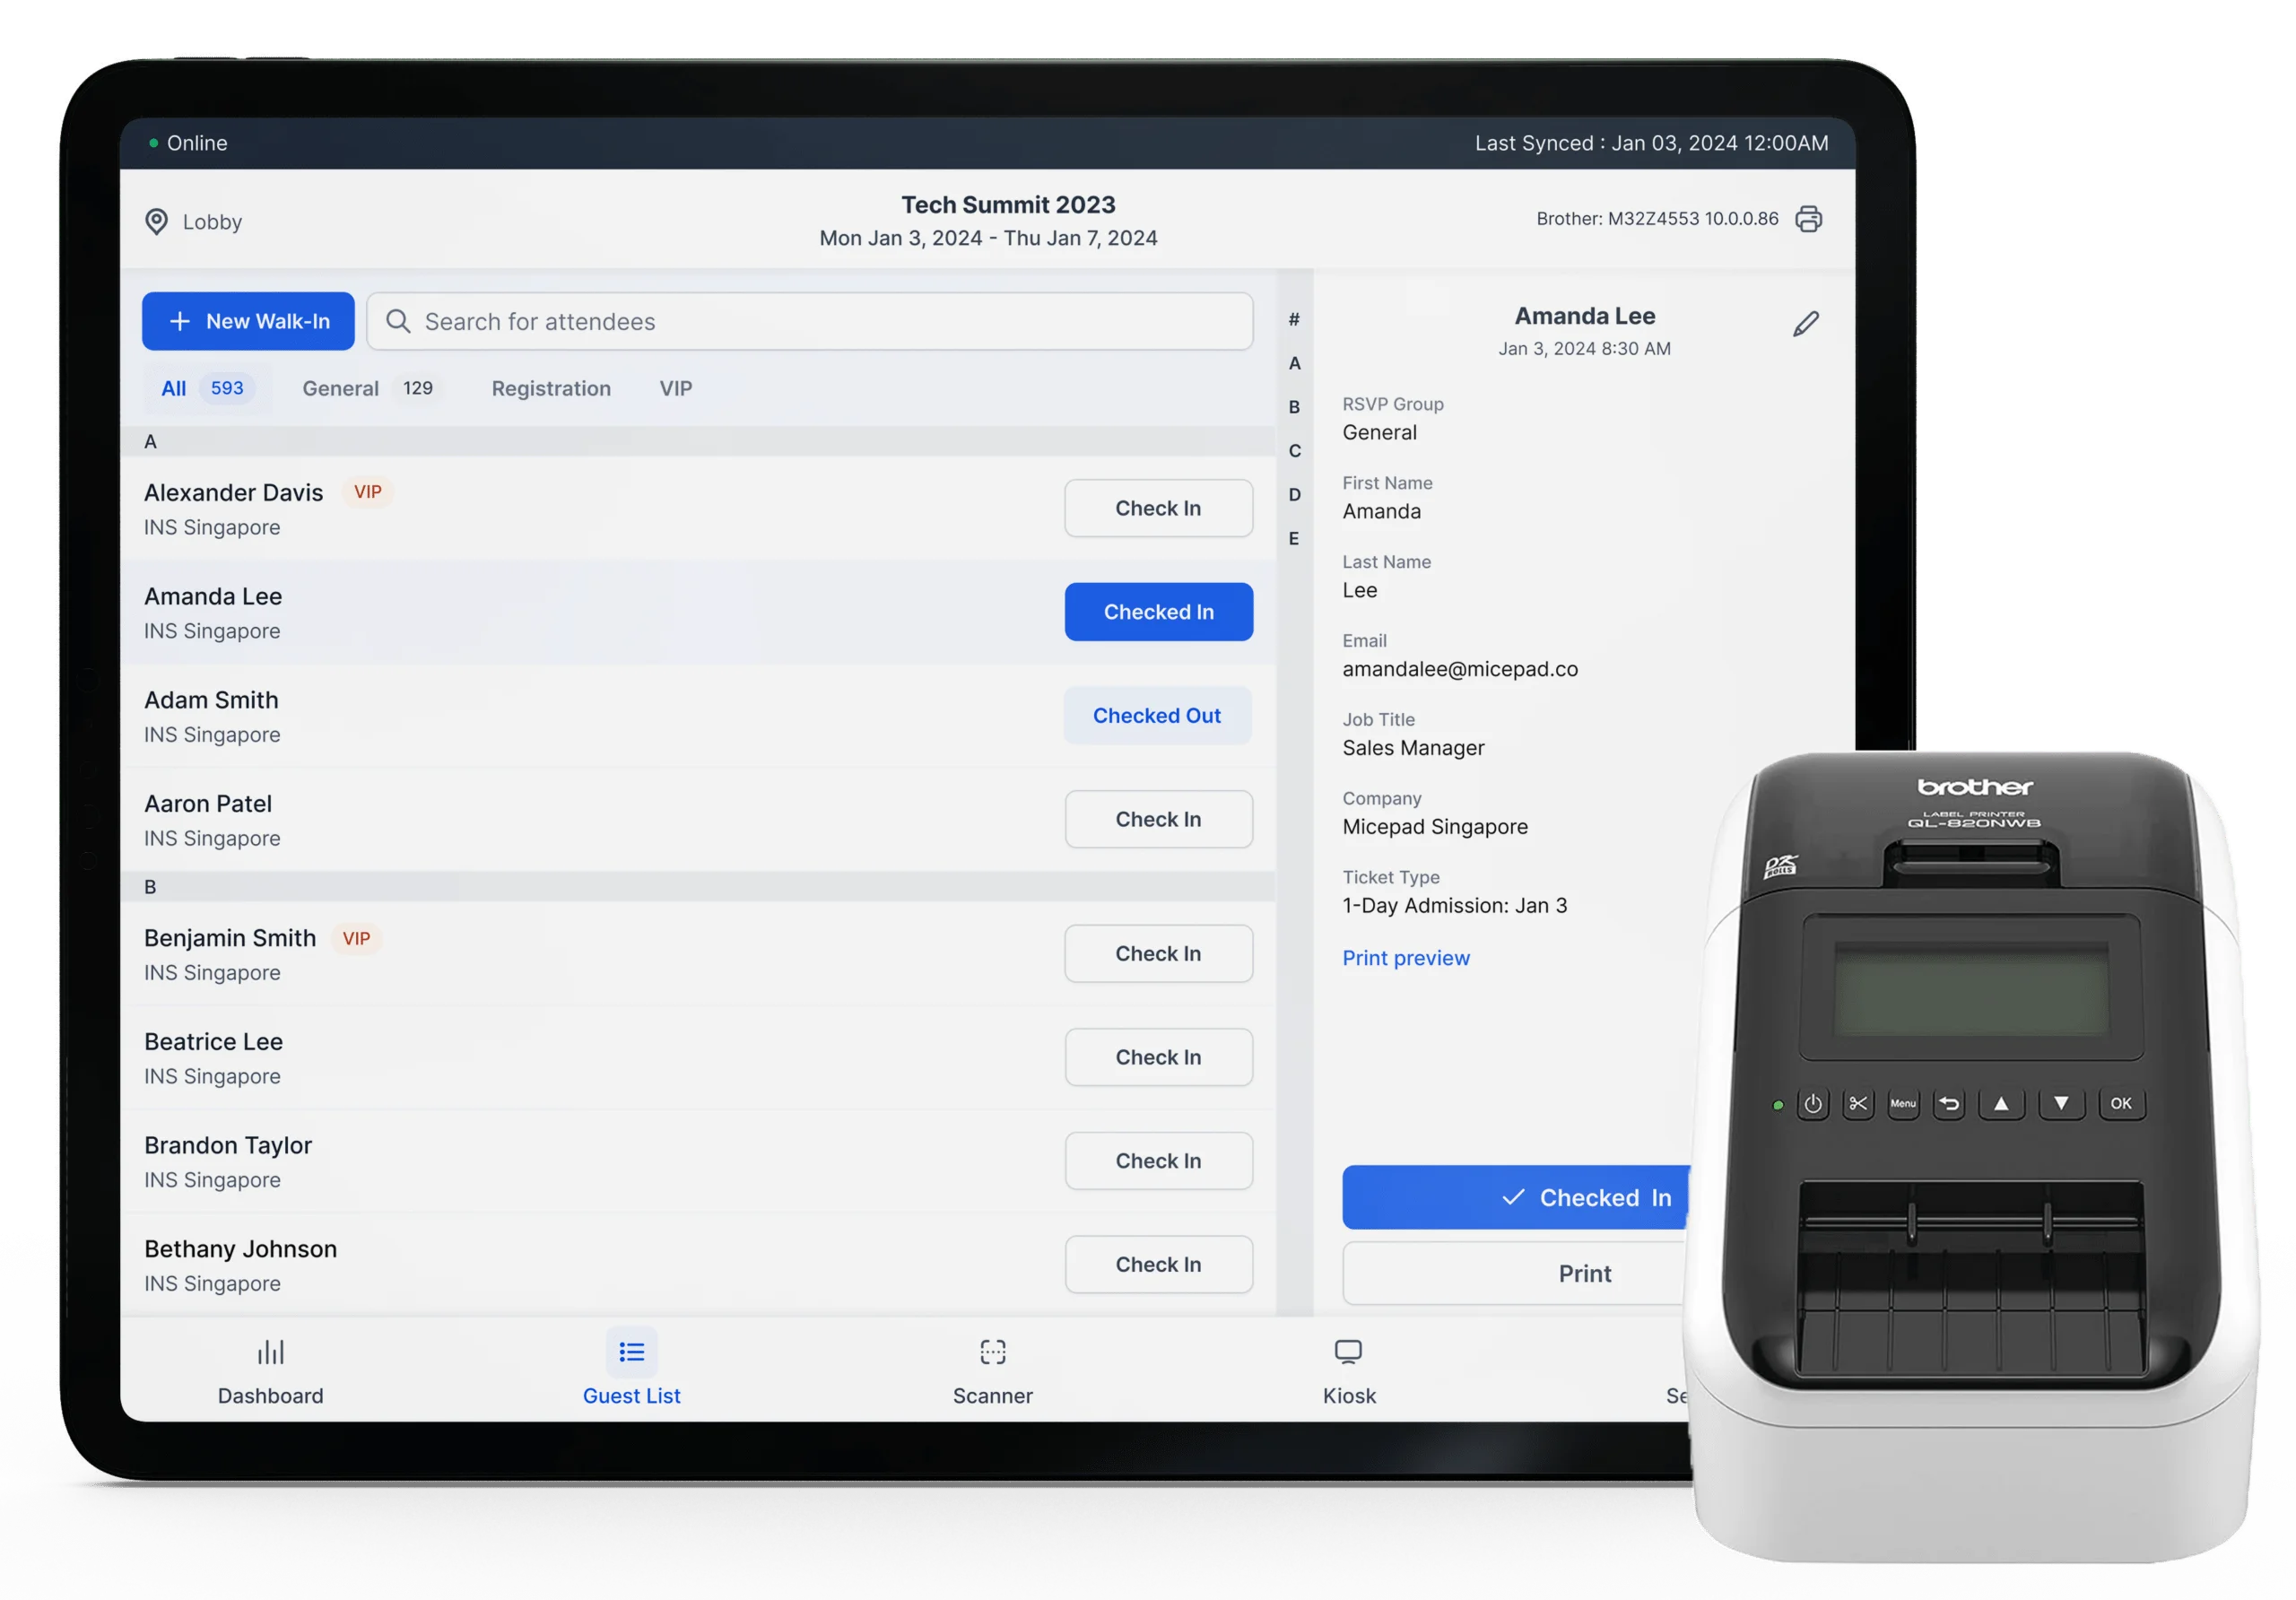
- Plan the check-in experience — will you use QR code scanning, NFC, or manual lookup?
Badge Design and Printing
- Design event badges — include name, organization, role, and any session-specific indicators
- Plan your badge printing setup: decide between pre-printing all badges or printing on demand at check-in
- On-demand badge printing dramatically reduces the wasted badges from no-shows and eliminates the pre-event scramble of sorting and boxing hundreds of badges alphabetically
- Order lanyards, badge holders, and any branded inserts
Technology Setup
- Select and configure your check-in software — test QR code scanning speed against your expected arrival rate
- Set up staff accounts and permissions in your event management platform
- Plan session tracking if you're monitoring which sessions attendees join
- Prepare audience engagement tools for interactive sessions: live polls, Q&A, word clouds
Vendors and Logistics
- Confirm all vendor bookings with written confirmations
- Share the venue floor plan and run-of-show with all vendors
- Arrange staff and volunteer recruitment — confirm headcount per station
- Finalize catering numbers and menu, including dietary alternatives
- Book photography and videography, confirm shot list
1 Week Before: Final Preparations
The last week is for closing gaps, not making changes. Anything unresolved now needs to be escalated immediately.
Logistics Checks
- Confirm all vendor arrival times and load-in schedules
- Walk the venue with your operations lead — check every room, power point, wifi network, and storage area
- Test all AV equipment in each session room
- Print and laminate key documents: run-of-show, staff assignments, emergency contacts
Check-in and Badge Readiness
- Run a full check-in system test with real attendee data
- Set up check-in kiosks or stations and test printing speed under simulated load
- Confirm badge stock, lanyard quantities, and printer supplies
- Prepare a manual backup process in case of system failure
Staff Briefing
- Hold a full team briefing — cover the run-of-show, escalation paths, and individual responsibilities
- Share an emergency contacts list with all staff
- Assign a dedicated troubleshooting lead for check-in, AV, and catering separately
- Confirm transport and parking arrangements for staff
Attendee Communication
- Send a final reminder email with everything attendees need: directions, parking, what to bring, agenda highlights
- Post event-day logistics on social media
- Prepare a day-of FAQ response template for your inbox
Day Of: Execution
The event day is about running the process you built, handling deviations calmly, and keeping energy high.
Setup and Pre-Open
- Arrive 2–3 hours before doors open
- Oversee vendor setup and confirm everything is in place before staff arrive
- Run a final AV check in all rooms
- Set up and test all check-in stations — confirm connectivity and printer status
- Brief all staff on their stations; confirm check-in team knows escalation process
- Do a final walk of the venue as attendees
Check-in Operations
- Open check-in lanes 30–45 minutes before the event starts to absorb early arrivals
- Assign dedicated staff to manage queues, assist with badge printing, and handle exceptions
- Monitor check-in speed — if queues build, open additional lanes or stations
- Track real-time attendance against your registration list so you know your actual audience size
Tip: A well-configured event check-in system should process most attendees in under 10 seconds. If you're seeing consistent slowdowns, have staff switch to a manual lookup mode while the issue is diagnosed.
During the Event
- Run session transitions to the run-of-show timeline
- Use live audience engagement tools — polls, Q&A, and word clouds — to maintain energy in sessions
- Capture content for post-event use: photos, video clips, key quotes
- Keep a live issues log — document any problem and its resolution in real time
- Have a dedicated point of contact for speaker support
Closing
- Announce closing remarks on schedule — respect attendee time
- Send attendees to a post-event survey or feedback form while the experience is fresh
- Supervise vendor pack-down and venue handover
- Secure all event assets: signage, equipment, leftover materials
Post-Event: Measurement and Follow-Up
The event ends when the doors close; the work ends when you've measured what happened and captured the learning.
Within 48 Hours
- Send a thank-you email to all attendees with the post-event survey link
- Send personalized follow-up emails to leads, VIP guests, and speakers
- Share key highlights and takeaways on social media while the moment is current
- Brief the sales team with attendee data and any leads generated
Analytics and ROI
- Pull final attendance data: registered vs. attended, no-show rate by ticket type
- Review check-in data — identify peak arrival times and any process bottlenecks
- Analyze survey results: NPS, session ratings, open-ended feedback
- Calculate event ROI against your pre-defined goals (leads, revenue, attendance, media coverage)
- Review budget actuals versus planned — note every variance and its cause
Team Debrief
- Run a structured post-mortem with your full planning team within one week
- Document what worked, what failed, and what you'd do differently
- Update your event planning template with the new learnings before you forget them
- Archive all vendor contacts, contracts, and operational documents for the next event
Using This as Your Event Planning Template
A checklist only works if it becomes a live document. Copy this structure into your project management tool of choice — Notion, Asana, Monday.com, or even a shared spreadsheet — and assign owners and due dates to each section.
The categories most often skipped or left too late:
- Check-in setup: teams routinely underestimate how long it takes to configure, test, and brief staff on check-in technology. Start this four to six weeks out.
- Badge design: last-minute badge changes are expensive and stressful. Freeze the design at least two weeks before the event.
- Post-event follow-up: the 48-hour window after an event is when attendee memory and goodwill are at their peak. Missing this window is leaving value on the table.
For a more focused look at what makes conference check-in run smoothly, the guides section covers the operational details — badge printing approaches, QR code check-in setup, and managing high-volume arrivals.
A well-executed event doesn't happen because everything went perfectly. It happens because the team anticipated problems, had processes ready, and made good decisions quickly when things deviated from plan. This checklist is the foundation — the judgment calls are still yours.
Free event-tech resources
Practical guides, comparison breakdowns, and case studies — published weekly.